Concrete Slump test for workability, Procedure, Result Range
The construction industry makes use of the hunch take a look at to assess the consistency and workability of fresh concrete. This take a look at offers important insights into the concrete’s plasticity and its ability for placement, compaction, and molding into the preferred shape.
The observed slump value indicates the degree of workability of the concrete. A higher droop indicates higher workability, meaning the concrete is extra fluid and easier to area, at the same time as a decrease slump implies lower workability and a greater inflexible, less fluid concrete blend.
Slump Values Specific Range limits according to different standards
| Structure Type | ASTM Standard | ACI Standard | BS EN Standard | IS Standard |
|---|---|---|---|---|
| High-rise Buildings | 50-100 mm (2-4 inches) | 75-125 mm (3-5 inches) | 40-90 mm | 75-100 mm |
| Residential Buildings | 75-125 mm (3-5 inches) | 50-100 mm (2-4 inches) | 20-80 mm | 50-75 mm |
| Pavements | 10-25 mm (0.5-1 inch) | 25-50 mm (1-2 inches) | 10-40 mm | 20-30 mm |
| Mass Concrete | 75-150 mm (3-6 inches) | 100-150 mm (4-6 inches) | 60-120 mm | 75-100 mm |
Slump values Range for various types of concrete structures
| Structure Type | Recommended Slump Range | Additional Details |
|---|---|---|
| Column Concrete | 50-100 mm (2-4 inches) | Lower slumps often preferred to ensure minimal segregation during vertical casting. The range allows for adequate workability and consolidation. |
| Beam Concrete | 40-90 mm (1.5-3.5 inches) | Lower slumps help maintain shape and prevent excessive deformation while providing enough workability for proper placement and consolidation. |
| Slab Concrete | 75-125 mm (3-5 inches) | Higher slumps are preferred to ensure ease of placement and leveling without excessive bleeding or segregation. |
| Foundation Concrete | 75-100 mm (3-4 inches) | Adequate workability for proper placement and compaction during the casting of the foundation. This range provides stability and consolidation. |
| Pavement Concrete | 10-25 mm (0.5-1 inch) | Low slumps for pavements ensure better finishing and durability against wear, helping in achieving a smooth surface and higher strength. |
| Marine/Underwater Structures | 100-150 mm (4-6 inches) | Higher slumps are often required for underwater structures to compensate for the higher water content and facilitate placement in wet conditions. |
| Mass Concrete (Dams, Foundations) | 75-150 mm (3-6 inches) | Range allows for proper placement, compaction, and reduced heat generation in large concrete masses. Lower end of the range is common for smaller masses. |
These ranges are indicative and might differ based on various factors. like mix design, construction methods, environmental conditions, and specific project requirements.
Standard
ASTM C143/C143M, (BSI) BS EN 12350-2, European Committee for Standardization (CEN) EN 206-1
Significance
Measuring the consistency and workability of sparkling concrete is a not unusual utility of the droop check. This test offers valuable insights into the concrete’s quality and its anticipated performance upon hardening. Additionally, the test results can guide adjustments to the mix proportions if needed.
Objective
The goal of this test is to determine the workability of clean concrete the use of the hunch take a look at.
Theory
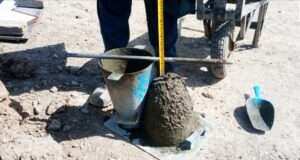
The droop take a look at evaluates fresh concrete consistency, gazing pattern deformation as the cone-shaped mould is eliminated. This test involves filling the mold in layers and lifting it to measure the concrete’s height difference.
Procedure
- Prepare the mold: The hunch mold have to be clean and freed from any debris. Lubricate the inner of the mold with a mild coat of oil.
- Prepare the concrete: Mix the concrete according to the desired mix design and pour it into a clean bucket.
- Fill the mold: Fill the mold in three layers, compacting each layer with a standard rod. Level the top of each layer with the mold’s top by striking it off.
- Remove the mold: After the final layer has been compacted, lift the mold off the concrete in a vertical direction. Be sure to remove the mold smoothly and without any jerking motion.
- Measure the slump: Immediately after removing the mold, measure the deformation of the concrete using a ruler. Measure the distance from the original height of the mold to the highest point of the concrete surface.
- Record the results: Record the slump measurement in millimeters and repeat the test two more times to obtain an average.
Calculation
Measuring the variance between the initial mold height and the concrete surface post-mold removal determines the slump. The test reports the result in both millimeters and inches.
Slump = Height of mold – Height of concrete
Read More Related
Slump Flow Test for Self-Compacting Concrete SCC
Determine the Flow table test of concrete
Brick Size Standards Around the World
Standard and Various Brick Sizes in the US
Determination of Crushing Value of Aggregate