The slump test is the site engineer’s favourite, but it has a blind spot: once concrete gets fluid enough to collapse the cone completely, the slump test can tell you nothing more. It just reads “collapse” for everything from a workable pumped mix to a segregated soup. The flow table test takes over exactly where the slump test gives up — it measures the consistency of medium to very-high-workability concrete by spreading it on a jolting table and measuring how far it flows.
The governing standard is BS EN 12350-5: Testing fresh concrete — Part 5: Flow table test. (The older British practice was BS 1881-105.) The test reports a flow value F — the mean spread diameter of the concrete in millimetres — and classifies the mix into consistency classes F1 to F6.
When Is the Flow Table Test Used?
- High-workability mixes — pumped concrete, tremie concrete, and flowing mixes where the slump test would simply collapse
- Site acceptance — checking truck-delivered concrete consistency before it goes into the formwork
- Mix development — comparing the fluidity of trial mixes in the laboratory
- Segregation check — the spread pattern visibly exposes a mix that is separating
It is not suitable for stiff or dry mixes (use the slump or Vee-Bee test instead), for foamed or no-fines concrete, or for concrete with maximum aggregate size above 63 mm. The test is most sensitive for flow values between about 340 and 600 mm — outside that range, other methods give better discrimination.
Apparatus
Per EN 12350-5, you need:
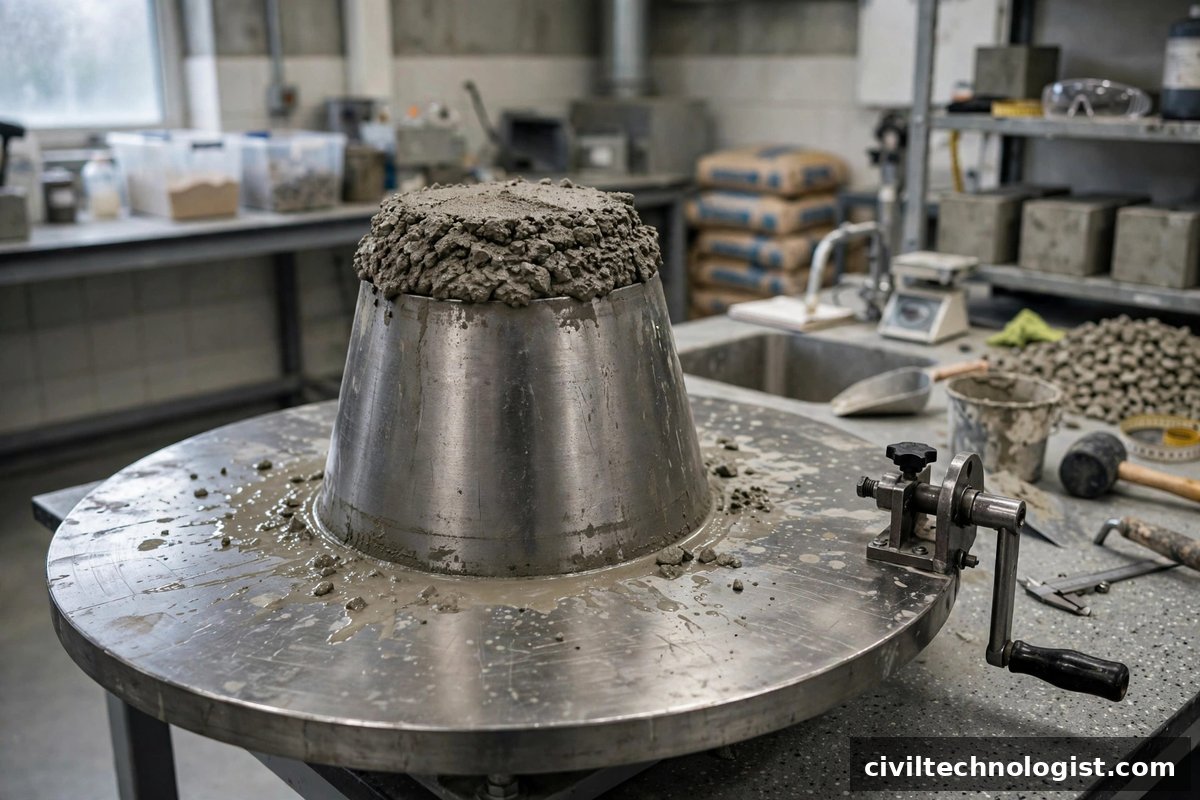
- Flow table — a 700 × 700 mm steel-topped board hinged along one edge to a base board, with a handle or lifting mechanism. The free edge is lifted to a stop and allowed to fall freely through 40 ± 1 mm. The moving top weighs about 16 kg.
- Mould — a metal frustum of a cone, 200 mm base diameter, 130 mm top diameter, 200 mm high (open at both ends). Note this is not the Abrams slump cone — it is shorter and wider.
- Tamping bar — hardwood, square section about 40 mm × 40 mm, at least 200 mm long.
- Tape or rule — at least 700 mm long, for measuring the spread.
- Ancillaries — damp cloth, scoop, remixing tray, timer.
Procedure (Step by Step)
- Prepare the table — place it on a firm, level surface, moisten the top plate, and wipe off surplus water.
- Position the mould — centre it on the table. Stand on the foot-pieces (if provided) or otherwise hold it firmly so it cannot shift while filling.
- Fill in two layers — fill the mould in two approximately equal layers. Tamp each layer 10 times with the hardwood tamping bar, distributing the strokes evenly. Top up the second layer if needed.
- Strike off — level the concrete flush with the top of the mould using the tamping bar, and clean any spillage from the table top around the mould.
- Wait 30 seconds from striking off, then lift the mould vertically in a steady motion taking 3–6 seconds. The concrete will slump into a low mound on its own.
- Stabilise the table — stand on the toe board at the front so the table cannot bounce on its base.
- Drop 15 times — lift the table top slowly to the upper stop and let it fall freely, repeating for 15 drops. Each cycle should take about 4 seconds (not less than 3.5, not more than 5). Do not jerk the lift or cushion the fall — both distort the result.
- Measure the spread — measure the largest dimension of the concrete spread in two directions parallel to the table edges (d₁ and d₂).
- Calculate the flow value — the mean of the two measurements.
- Check for segregation — look at the edge of the spread. If the cement paste has separated from the coarse aggregate, forming a ring of paste extending beyond the aggregate, the test is unsatisfactory and the mix is segregating.
Calculation and Worked Example
Flow value F = (d₁ + d₂) / 2, recorded to the nearest 10 mm.
Example: After 15 drops, the spread measures d₁ = 480 mm and d₂ = 500 mm.
F = (480 + 500) / 2 = 490 mm → recorded as 490 mm.
From the consistency table below, 490 mm falls in class F4 — very soft. If the specification called for F3 (420–480 mm), this batch is slightly more fluid than required — worth a note on the test record and a check of the batch water.
Consistency Classes (F1–F6)
| Class | Mean spread F (mm) | Description |
|---|---|---|
| F1 | ≤ 340 | Stiff |
| F2 | 350–410 | Plastic |
| F3 | 420–480 | Soft |
| F4 | 490–550 | Very soft |
| F5 | 560–620 | Very soft |
| F6 | ≥ 630 | Very soft |
Common Mistakes
- Jerking the table up or cushioning the fall — adds or removes energy and shifts the spread by tens of millimetres.
- A dry or dirty table top — friction holds the concrete back and understates the flow. Moisten and wipe every time.
- Skipping the 30-second wait — lifting the mould immediately after filling gives a different (usually larger) spread than the standard procedure.
- Measuring diagonally or at random angles — the standard says two directions parallel to the table edges. Consistency of method is what makes results comparable.
- Testing a segregating mix and reporting the number anyway — the number is meaningless if the spread shows a paste ring. Report “segregation observed — test unsatisfactory.”
Frequently Asked Questions
What is the flow table test used for?
It measures the consistency (fluidity) of fresh concrete that is too workable for the slump test — typically pumped, flowing, or high-workability mixes — by dropping a filled mould’s contents on a jolting table 15 times and measuring the spread.
Which standard governs the flow table test?
BS EN 12350-5 (Testing fresh concrete — Part 5: Flow table test). The older British standard was BS 1881-105.
How is the flow value calculated?
F = (d₁ + d₂) / 2, where d₁ and d₂ are the maximum spread diameters measured in two directions parallel to the table edges. It is recorded to the nearest 10 mm.
What are the F1–F6 classes?
Consistency classes based on mean spread: F1 (≤340 mm, stiff), F2 (350–410 mm, plastic), F3 (420–480 mm, soft), F4 (490–550 mm), F5 (560–620 mm), F6 (≥630 mm) — all “very soft” above F3.
How is the flow table test different from the slump test?
The slump test measures how far concrete subsides under its own weight after a cone is lifted — it suits stiff to medium mixes. The flow table test adds 15 controlled jolts and measures the resulting spread — it suits medium to very fluid mixes where the slump cone would simply collapse.
Final Thoughts
The flow table test is a small, cheap apparatus that answers a question the slump test cannot: how fluid is this fluid concrete, exactly? Run it by the book — moist table, 10 tamps per layer, 30-second wait, 15 free drops, measure parallel to the edges — and the F-value you record will mean the same thing in your lab as it does in anyone else’s.
Written by Mohsin Raza Adil — BSc Civil Engineering Technologist (NTC-registered), Pakistan.

Mohsin Raza Adil
BSc Civil Engineering Technologist (NTC-registered), Pakistan. I write practical, field-tested guides on construction materials, soil testing and site engineering — the way it is actually done on site.


2 thoughts on “Flow Table Test of Concrete: Procedure, Calculation and Apparatus”