The base course is the main load-spreading layer of a road pavement. It sits between the sub-base (or subgrade) and the surface course, and its job is to take concentrated wheel loads and spread them over a wide enough area that the weaker layers below are not overstressed. When a road fails with deep rutting or alligator cracking, the base is very often where the problem started.
This guide explains the three common base systems — WBM, WMM, and crusher-run — their material requirements, how each is built, and the quality checks that decide whether the layer will perform.
Where the Base Course Fits in a Road
From bottom to top, a flexible pavement is typically built as:
- Subgrade — the prepared natural soil (compacted, cambered).
- Sub-base course — granular layer (GSB) that drains and protects the subgrade.
- Base course — the structural layer (WBM, WMM, or crusher-run).
- Surface course — bituminous layers (binder + wearing course), or concrete in rigid pavements.
Typical compacted thickness of the base is 150–250 mm, laid in layers of about 75–100 mm each.
The Three Base Systems: WBM vs WMM vs Crusher-Run
| Feature | WBM (Water Bound Macadam) | WMM (Wet Mix Macadam) | Crusher-Run Macadam |
|---|---|---|---|
| Aggregate | Large, single-size stone (e.g. 63–45 mm, 53–22.4 mm for base) | Well-graded crusher-run aggregate (53 mm down to dust) | Crusher-run graded aggregate |
| Binding | Stone screenings + binder material, washed in with water in stages | Water pre-mixed at a mixing plant; fines in the grading bind the mass | Mechanical interlock of graded particles; minimal added fines |
| Mixing | Components laid in phases on the road | All components pre-mixed in a plant at near-optimum moisture | Spread directly from crusher output |
| Laying | Manual spreading with templates, or grader | Paver finisher (grader for lower layers) | Grader |
| Speed | Slow | Fast | Fast |
| Equipment | 8–10 tonne roller | Roller of minimum 100 kN static weight | Heavy roller |
| Typical use | Rural and low-traffic roads; repairs | Highways and major roads (the modern standard) | Sub-base and base where specs allow |
Materials and Specifications — What the Aggregate Must Pass
A base course is only as good as its stone. The aggregate must be hard, durable, and angular — crushed stone is preferred, because angular faces lock together under the roller. Rounded river gravel looks similar in a heap, but it has no interlock, so it shifts under wheel loads and the layer ruts. That is why every specification for base aggregate starts with the stone itself, not with the laying method. In Pakistan and India the reference specs are MoRTH Clause 404 for WBM and Clause 406 for WMM, with grading from IRC 19 for WBM.
WMM uses one well-graded mix, 53 mm down to dust, so that every size fills the voids left by the size above it. The grading envelope from MoRTH Table 400-13 is:
| IS Sieve Size | % Passing by Weight |
|---|---|
| 53 mm | 100 |
| 45 mm | 95–100 |
| 22.4 mm | 60–80 |
| 11.2 mm | 40–60 |
| 4.75 mm | 25–40 |
| 2.36 mm | 15–30 |
| 600 micron | 8–22 |
| 75 micron | 0–5 |
If the mix is too coarse, the layer stays open and hungry for fines; if it is too fine, it behaves like soil and loses strength when wet. A sieve analysis of the delivered mix is the first check on site — the full procedure is covered in our sieve analysis guide.
Grading alone is not enough. The stone must also pass strength and shape tests. The limits below are the MoRTH values for base course use:
| Test | WMM Limit (MoRTH Table 400-12) | WBM Limit (Base Course) |
|---|---|---|
| Los Angeles abrasion value | 40% max | 40% max |
| Aggregate impact value | 30% max | 30% max |
| Combined flakiness and elongation index | 35% max | 30% max |
| Water absorption | 2% max | 2% max |
Two points are worth knowing on site. First, MoRTH accepts either the Los Angeles abrasion value or the aggregate impact value — the stone needs to pass one of the two, not both. Second, the fines in a WMM mix must not be plastic: their plasticity index is limited to 6%, and if water absorption is above 2%, a soundness test is required (maximum 12% loss with sodium sulphate).
Construction Method — Step by Step
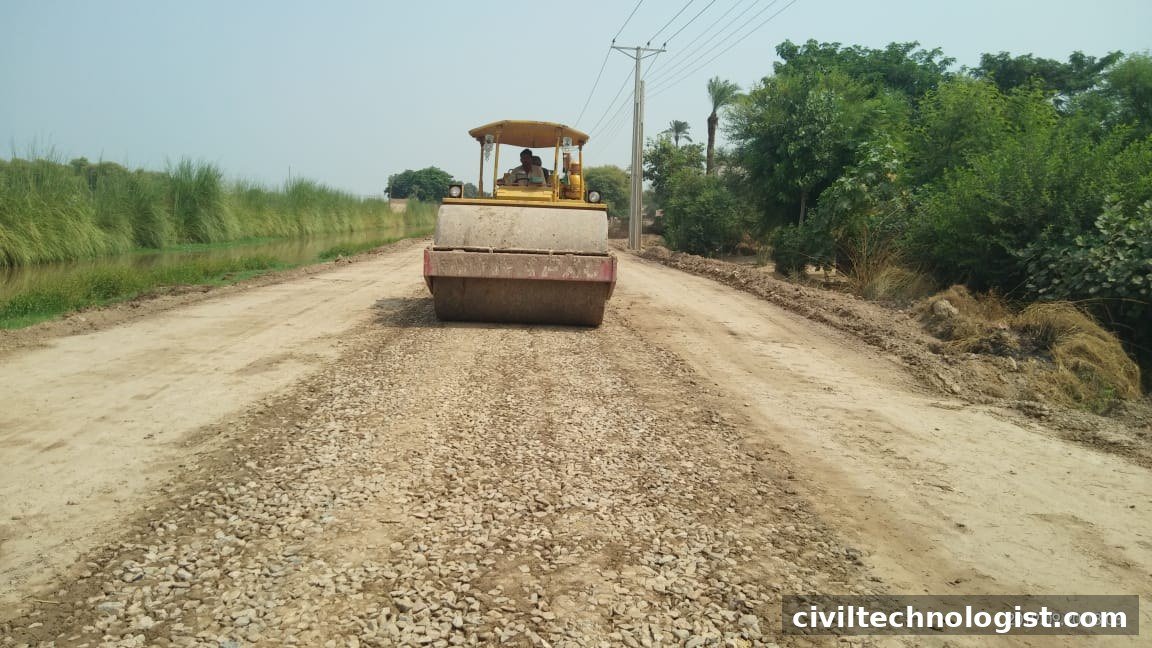
A smooth-drum roller compacting the stone soling layer; adequate rolling is what locks the aggregate into a stable base.
WBM Construction
- Prepare the foundation. The sub-base or subgrade is shaped to the correct camber and compacted.
- Spread the coarse aggregate. Stone is spread uniformly in the required thickness using templates or a grader.
- Dry roll. An 8–10 tonne roller compacts the stone until it is keyed together.
- Apply screenings in stages. Screenings are spread in three or more thin layers, each broomed into the voids and dry-rolled.
- Sprinkle water and work in the fines. Water is sprinkled and the wet screenings are swept and rolled into the voids.
- Apply binding material. The binder is spread in two or more layers, watered, and the resulting slurry is broomed and rolled into the remaining voids.
WMM Construction
- Prepare the foundation exactly as for WBM — shaped, cambered, compacted.
- Mix at the plant. Graded aggregate and water are mixed in a pugmill-type mixing plant at slightly above optimum moisture content.
- Spread with a paver. The mix is laid with a self-propelled paver finisher to the required loose thickness.
- Roll immediately. A roller of at least 100 kN static weight compacts the layer until the surface is dense.
- Check and correct. Levels, camber, and thickness are checked; low spots are scarified, made up with fresh mix, and re-rolled.
Crusher-Run Construction
Crusher-run has no plant mixing and no screenings stages — its strength comes entirely from the interlock of a well-graded mass, so the laying has to be right.
- Spread in a uniform layer. The crusher output is spread with a grader in an even layer. Do not end-dump it in heaps — that segregates the coarse stone from the fines before rolling even starts.
- Shape and check levels. The layer is shaped to the required camber and the levels are checked before any rolling.
- Sprinkle water. Water is sprinkled to bring the mix close to optimum moisture content — too dry and it will not compact, too wet and it pumps under the roller.
- Roll until dense. A heavy roller compacts the layer until the surface is dense and no further movement is visible under the drum.
- Correct, do not patch. Low spots are scarified, made up with fresh material, and re-rolled. Never fill a low spot with a thin skin of fines on top of a compacted layer — it will peel off under the first rain and the first truck.
How Thick Should the Base Be?
The thickness is not a guess and not a habit — it comes from the pavement design. Under IRC 37, the designer works from two inputs: the traffic the road must carry (in million standard axles) and the strength of the subgrade below it, measured by the CBR test. Heavy traffic on a weak subgrade needs a thicker base; light traffic on a strong subgrade needs less. That is why the typical range is 150–250 mm compacted, and why the same road can have different base thicknesses in different stretches. Whatever the design says, build it in layers — WBM in layers of 75–100 mm each — and compact every layer before the next goes on. A base thinner than the design lets wheel loads reach the subgrade, and the road ruts within a season or two. A base thicker than the design mostly wastes money, and if the drainage is poor it can even hold water against the layers below.
Worked Example — Aggregate for 1 km of Road
Take a 1 km stretch of road, 7.0 m wide, with a 200 mm base. The compacted volume is 1,000 × 7.0 × 0.20 = 1,400 m³. Loose aggregate takes up more space than compacted aggregate, so allow roughly 20–25% extra when ordering — about 1,700–1,750 m³ for this stretch. The exact loose factor varies with the stone and the plant, so confirm it from the trial section before ordering the full quantity, and always order a little extra rather than a little less: running short mid-layer means a cold joint in the middle of your base.
Common Defects — and What Causes Them
Most base failures are construction failures, not design failures. The five below cover nearly everything that goes wrong:
Segregation. The mix separates while it is spread, leaving coarse patches with no fines and fine patches with no stone. It happens when material is end-dumped from height or spread carelessly. Prevent it by spreading in thin, even layers and never letting the mix fall freely.
Inadequate compaction. Density below 98% of maximum dry density leaves air in the layer, and traffic finishes the compaction for you — as ruts. Roll at the right moisture, with enough passes, and check density before the next layer goes on.
Standing water. A base that stays wet loses strength, and fines pump up through the surface under traffic. The cure is camber and side drains, not more rolling.
Soft spots. A weak patch in the subgrade below shows up as a dip that keeps coming back. Dig it out and replace it; rolling over it only hides it for a week.
Edge breakage. The edge of the base has no lateral support, so it crumbles where the shoulder is missing or weak. Build the shoulder with the base, not after it.
Base Course vs Sub-Base — the Difference
The two layers are often confused because both are granular, but they do different jobs. The base course sits directly under the surface course and does the structural work — it spreads wheel loads. The sub-base sits under the base, on top of the subgrade: it drains water away from the pavement, protects the subgrade from frost and traffic, and separates the base stone from the soil below so the two do not mix. Because the base carries more load, its aggregate is stronger and better graded; the sub-base can use lower-grade granular material (GSB). In short: the sub-base protects, the base carries.
Quality Control Checks
| Check | What it tells you | Typical requirement |
|---|---|---|
| Gradation (sieve analysis) | Whether the aggregate meets the grading band | Within the specified envelope (e.g. MoRTH Table 400-13) |
| Field density (sand cone / core cutter) | Whether compaction is adequate | Usually ≥ 98% of laboratory maximum dry density |
| Thickness | Whether the structural design is actually built | Within a small tolerance of design (commonly ±10 mm — check your spec) |
| Camber / crossfall | Whether water will drain off the surface | Checked with camber boards/templates at regular intervals |
Frequently Asked Questions
What is the difference between WBM and WMM?
In WBM, coarse aggregate, screenings, and binder are laid in separate phases on the road and bound with water. In WMM, graded aggregate and water are pre-mixed in a plant and laid with a paver. WMM is faster and gives more uniform density.
What thickness should a base course be?
Typically 150–250 mm compacted, laid in layers of about 75–100 mm. The exact thickness comes from the pavement design for the expected traffic.
How is base course compaction checked?
By field density tests — the sand cone or core cutter method — compared against the laboratory maximum dry density, usually requiring at least 98%.
Can crusher-run be used as a base course?
Yes, where the specification allows it — it is commonly used as sub-base and as base on low-traffic roads. It needs good grading and heavy rolling, because there is no plant mixing to fix a bad gradation. On highways, WMM is the usual choice.
Why is WMM preferred over WBM on highways?
WMM is mixed in a plant, so the moisture and grading are uniform through the whole layer, and a paver lays it fast and level. WBM is laid by hand in stages, which is slower and depends heavily on the crew. WBM still makes sense for rural roads and repair patches, where a plant and paver are not available.
What happens if the base course is too thin?
Wheel loads pass through to the subgrade, which was never meant to carry them directly. The result is rutting, and then alligator cracking in the surface above. A thin base is the most expensive saving on a road — it costs a little less to build and a great deal more to repair.
Final Thoughts
The base course is the layer nobody sees and everybody blames when the road fails. Correct grading, correct moisture, immediate and adequate rolling, and honest density testing — get those four right and the pavement above has a fighting chance.
Written by Mohsin Raza Adil — BSc Civil Engineering Technologist (NTC-registered), Pakistan.

Mohsin Raza Adil
BSc Civil Engineering Technologist (NTC-registered), Pakistan. I write practical, field-tested guides on construction materials, soil testing and site engineering — the way it is actually done on site.


9 thoughts on “Base Course Construction: Materials, Specifications, and Methods”