How fast water moves through soil decides whether a foundation stays dry, a retaining wall survives, or an embankment dam leaks. The falling head permeability test is the standard laboratory method for measuring this property — the coefficient of permeability (k) — in fine-grained soils where water flows too slowly for other methods.
What the Permeability Test Measures
Permeability is a soil’s ability to let water flow through its pores. The coefficient of permeability (k) quantifies this: it is the discharge velocity of water through soil under a unit hydraulic gradient, usually expressed in cm/s or m/s.
Darcy’s law governs the flow:
q = k · i · A
where q is the discharge, i is the hydraulic gradient (head loss per unit length), and A is the cross-sectional area of the soil sample.
Permeability matters in practice for:
- Seepage analysis — estimating water flow under dams, cofferdams, and through embankments.
- Drainage design — sizing subsoil drains, filter layers, and dewatering systems for excavations.
- Consolidation studies — the rate at which clay settles depends directly on how fast pore water can escape.
- Contaminant transport — predicting how quickly pollutants migrate through soil strata.
Falling Head vs Constant Head: Which Test to Use?
This is the first decision, and it depends on the soil’s grain size:
| Test | Suitable for | Typical soil |
|---|---|---|
| Falling head (variable head) | Fine-grained, low-permeability soils | Silts, clays, silty sands |
| Constant head | Coarse-grained, high-permeability soils | Sands, gravels |
The reason is practical. In a constant head test, you measure the volume of water flowing through the sample in a given time — that works fine when water rushes through sand. In clay, the flow is so small that collecting a measurable volume takes far too long. The falling head test solves this by measuring how fast the water level drops in a narrow standpipe connected to the sample instead. A small discharge produces a clearly readable change in head.
Governing Standards
- IS 2720 (Part 17) — Methods of test for soils: laboratory determination of permeability.
- BS 1377-5 — Methods of test for soils for civil engineering purposes, Part 5: compressibility, permeability and durability tests (covers both falling head and constant head procedures).
Apparatus
- Permeameter mould — a cylindrical mould (typically 100 mm internal diameter) with a base plate, top plate, and porous stones at both ends of the specimen.
- Standpipe — a narrow graduated glass tube (typically about 10 mm internal diameter) connected to the top of the permeameter, mounted vertically against a graduated scale.
- Water reservoir and tubing — to fill the standpipe and keep the sample saturated.
- Stopwatch — for timing the head drop.
- Balance, oven, and thermometer — for determining the specimen’s water content, void ratio, and the water temperature (permeability is corrected to 20 °C).
Test Procedure (Step by Step)
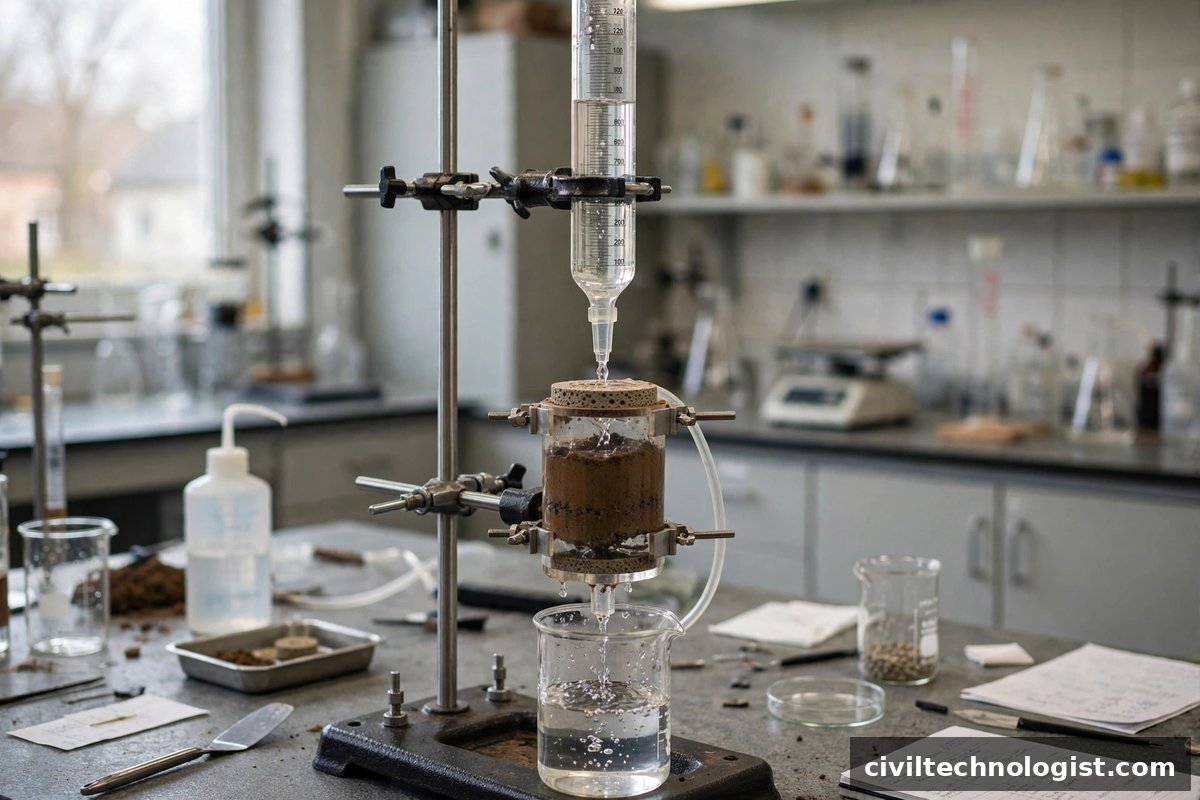
- Prepare the specimen. Compact or place the soil in the permeameter mould to the required density, with porous stones and filter paper at both ends. Record the specimen’s length (L) and diameter.
- Saturate the sample. Connect the permeameter to a water supply and allow water to flow upward through the specimen until it is fully saturated and all air is expelled. A partially saturated sample gives a falsely low k.
- Fill the standpipe. Fill the standpipe with water to a convenient starting level and note the initial head h₁.
- Start the timer and let the head fall. Water flows through the specimen, and the level in the standpipe drops. When it reaches a chosen lower level h₂, stop the timer and record the elapsed time t.
- Repeat. Take at least two or three readings with different head drops. The results should agree closely; average them.
- Record the water temperature and determine the specimen’s water content and void ratio at the end of the test.
Practical note: De-aired (or at least freshly boiled and cooled) water gives more consistent results, because dissolved air can come out of solution inside the specimen and block pores.
The Falling Head Formula
The coefficient of permeability at the test temperature is:
k = (a · L) / (A · t) · ln(h₁ / h₂)
where:
- a = cross-sectional area of the standpipe
- A = cross-sectional area of the soil specimen
- L = length of the soil specimen
- t = time taken for the head to fall from h₁ to h₂
- h₁ = initial head, h₂ = final head
- ln = natural logarithm
Using common (base-10) logarithms, the same formula becomes:
k = 2.303 · (a · L) / (A · t) · log₁₀(h₁ / h₂)
Units: If a, A are in cm², L, h₁, h₂ in cm, and t in seconds, k comes out in cm/s.
Temperature correction
Because water’s viscosity changes with temperature, results are corrected to the standard 20 °C:
k₂₀ = k_T · (η_T / η₂₀)
where η_T and η₂₀ are the viscosities of water at the test temperature and at 20 °C.
Worked Example
A falling head permeability test is carried out on a silty clay specimen with the following observations:
- Specimen diameter = 100 mm → A = π × (10 cm)² / 4 = 78.54 cm²
- Specimen length, L = 12.7 cm
- Standpipe internal diameter = 10 mm → a = π × (1.0 cm)² / 4 = 0.785 cm²
- Initial head, h₁ = 100 cm
- Final head, h₂ = 50 cm
- Time for the head drop, t = 600 s (10 minutes)
Step 1 — Apply the formula:
k = (a · L) / (A · t) · ln(h₁ / h₂)
k = (0.785 × 12.7) / (78.54 × 600) × ln(100 / 50)
Step 2 — Compute the area-length term:
(0.785 × 12.7) = 9.9695
(78.54 × 600) = 47,124
9.9695 / 47,124 = 2.1156 × 10⁻⁴
Step 3 — Compute the head term:
ln(100 / 50) = ln(2) = 0.6931
Step 4 — Multiply:
k = 2.1156 × 10⁻⁴ × 0.6931 = 1.47 × 10⁻⁴ cm/s
Step 5 — Convert to m/s:
k = 1.47 × 10⁻⁴ cm/s = 1.47 × 10⁻⁶ m/s
Interpretation: A k of ~1.5 × 10⁻⁴ cm/s sits in the silty-sand-to-silt range — a reasonable result for a silty clay with some sand content, and exactly the kind of soil the falling head test is designed for.
Typical Coefficient of Permeability by Soil Type
Use these orders of magnitude as a sanity check on your lab results:
| Soil type | Typical k (cm/s) | Drainage character |
|---|---|---|
| Clean gravel | 1 and greater | Very good |
| Coarse sand | 1 to 10⁻¹ | Good |
| Medium sand | 10⁻¹ to 10⁻² | Good |
| Fine sand | 10⁻² to 10⁻³ | Fair |
| Silty sand | 10⁻³ to 10⁻⁴ | Poor |
| Silt | ~10⁻⁵ | Poor |
| Clay | 10⁻⁷ to 10⁻⁹ | Practically impervious |
If your falling head result for a “clay” comes out at 10⁻³ cm/s, something is wrong — suspect incomplete saturation, side-wall leakage along the mould, or a misidentified soil.
Common Errors to Avoid
- Incomplete saturation — the single most common cause of low readings. Take time over this step.
- Side-wall leakage — water bypassing the specimen along the mould wall inflates k.
- Air bubbles in the standpipe or tubing — they distort head readings. Flush the lines before starting.
- Too-short test duration — for very low-permeability clays, allow the head to fall over hours, not minutes, and run duplicate specimens.
- Skipping the temperature correction — a test run at 30 °C versus 20 °C differs by roughly 25% after correction.
Frequently Asked Questions
When is the falling head test used instead of the constant head test?
Falling head is used for fine-grained, low-permeability soils (silts, clays, silty sands) where the discharge is too small to measure reliably in a constant head setup. Constant head suits coarse-grained soils like sands and gravels.
What is the formula for the falling head permeability test?
k = (a·L)/(A·t) · ln(h₁/h₂), where a is the standpipe area, A the specimen area, L the specimen length, t the time for the head to fall from h₁ to h₂. The result is corrected to 20 °C before reporting.
What is a good coefficient of permeability for clay?
Clays typically show k between 10⁻⁷ and 10⁻⁹ cm/s — effectively impervious. Values in this range confirm the falling head test was the right choice of method.
Can the falling head test be done in the field?
The laboratory version described here uses a permeameter mould. Field permeability is measured differently — typically with pumping tests (below the water table) or packer/open-end tests in boreholes.
Final Thoughts
The falling head test is a simple, elegant piece of laboratory work: a narrow tube, a soil sample, and a stopwatch are enough to measure one of the most consequential properties in geotechnical engineering. Choose the right test for the soil in front of you, saturate the specimen properly, correct for temperature, and always sanity-check the answer against the typical ranges above.
Written by Mohsin Raza Adil — BSc Civil Engineering Technologist (NTC-registered), Pakistan.

Mohsin Raza Adil
BSc Civil Engineering Technologist (NTC-registered), Pakistan. I write practical, field-tested guides on construction materials, soil testing and site engineering — the way it is actually done on site.