Before a single layer of a road is laid, the designer asks one question about the ground beneath it: how strong is this subgrade? The answer that has guided flexible pavement design for nearly a century is a single number — the California Bearing Ratio (CBR).
Developed by the California Division of Highways in the 1920s, the CBR test compares the penetration resistance of your soil against that of a standard crushed rock. The result, expressed as a percentage, feeds directly into pavement thickness design: weak subgrade (low CBR) means a thicker, costlier pavement; strong subgrade (high CBR) means you can build thinner.
What the Test Measures
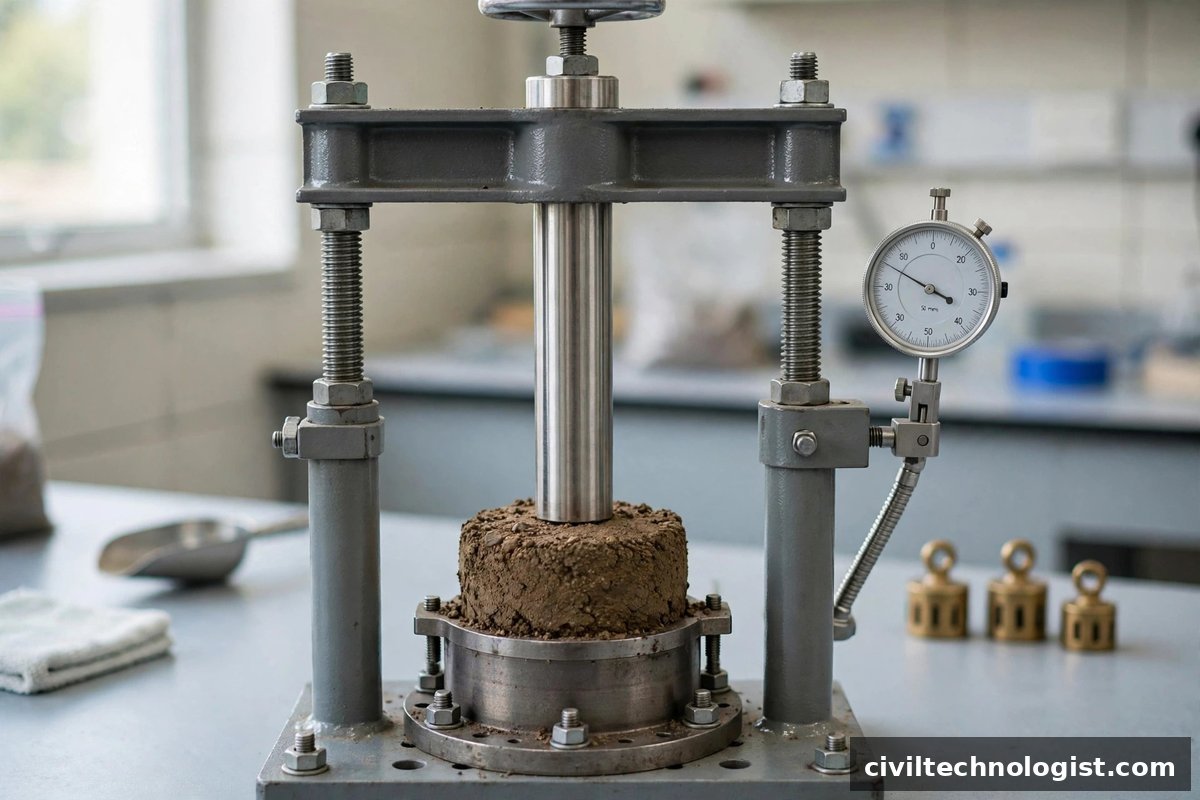
A standard plunger — 50 mm in diameter — is pushed into a compacted soil specimen at a fixed rate, and the load needed to reach certain penetration depths is recorded. The same penetrations into a standard crushed stone need known “standard loads”:
| Penetration | Standard load |
|---|---|
| 2.5 mm | 1,370 kg (13.44 kN) |
| 5.0 mm | 2,055 kg (20.16 kN) |
CBR = (test load / standard load) × 100
A CBR of 10% means your soil resists penetration one-tenth as well as the standard crushed rock. Note that CBR is an empirical index, not a fundamental soil property like shear strength — its value comes from decades of correlation with how real pavements perform.
The Standards
- ASTM D1883 — Standard Test Method for California Bearing Ratio (CBR) of Laboratory-Compacted Soils (the lab test)
- AASHTO T 193 — The CBR of Laboratory-Compacted Soils (the AASHTO equivalent, widely used in Pakistan and the Middle East)
- Related: IS 2720 (Part 16) in India, BS 1377-4 in the UK, and ASTM D4429 for the field (in-place) CBR test
Apparatus
- Cylindrical mould, 150 mm diameter (with base plate, collar, and spacer disc)
- Loading frame with a penetration plunger 50 mm in diameter
- Dial gauges — one for penetration, one for measuring swell during soaking
- Surcharge weights (total normally not more than 4.5 kg) to simulate the weight of the pavement
- Compaction rammer (Proctor hammer) for preparing the specimen
- Soaking tank large enough to submerge the mould
Test Procedure
1. Prepare the specimen
Compact the soil in the mould at its optimum moisture content (OMC) to the required density (usually the maximum dry density from the Proctor test). In Pakistan practice, specimens are commonly compacted with the modified Proctor effort — 5 layers — so the lab density matches what the rollers achieve in the field. Prepare at least three specimens for a reliable average.
2. Soak for 4 days (the soaked test)
Place a surcharge weight on the specimen — roughly equal to the weight of the pavement that will sit on it — and submerge the whole mould in water for 4 days. This simulates the worst condition the subgrade will face: fully saturated after the rains. Record the swell (expansion) on the dial gauge each day. Excessive swell is itself a red flag — it marks an expansive clay that may need treatment regardless of its CBR.
An unsoaked test may also be run for comparison, but pavement design is normally based on the soaked value, because roads fail in the wet season, not the dry one.
Practical note: Four days of soaking feels like dead time, but it is the most honest part of the test. I have seen subgrades that looked excellent dry and collapsed to a CBR of 2–3% after soaking. If your project is in a high-water-table or flood-prone area, never design on an unsoaked number.
3. Penetrate
Place the mould under the loading frame, seat the 50 mm plunger on the specimen with a small seating load, and penetrate at a steady 1.25 mm per minute. Record the load at penetrations of 0.5, 1.0, 1.5, 2.0, 2.5, 3.0, 4.0, 5.0, 7.5, 10.0, and 12.5 mm. Plot the load–penetration curve.
4. Calculate
Compute the CBR at both 2.5 mm and 5.0 mm penetrations:
CBR₂.₅ = (load at 2.5 mm / 1,370 kg) × 100
CBR₅.₀ = (load at 5.0 mm / 2,055 kg) × 100
Normally the 2.5 mm value is reported. But if the 5.0 mm value comes out higher, repeat the test. If the repeat confirms it, report the 5.0 mm value — the standard requires the higher of the two when the retest agrees.
Worked Example
A soaked subgrade specimen gives these proving-ring readings (converted to load):
- Load at 2.5 mm penetration = 210 kg
- Load at 5.0 mm penetration = 300 kg
CBR₂.₅ = (210 / 1,370) × 100 = 15.3%
CBR₅.₀ = (300 / 2,055) × 100 = 14.6%
The 2.5 mm value is higher, so CBR = 15% (reported to the nearest whole number).
A second specimen gives 14% and a third gives 16% — the design CBR for this subgrade would be taken around 15%, a fair subgrade for a rural or district road.
Typical CBR Values by Soil Type
These indicative ranges help you sanity-check a lab report before it goes into a design:
| Soil type | Typical CBR (%) |
|---|---|
| Clay (soft, saturated) | ~2 |
| Clayey sand | 5 – 20 |
| Poorly graded sand | ~7 |
| Well-graded sand | ~10 |
| Well-graded sandy gravel | ~15 |
| Silty gravel | 20 – 60 |
| Poorly graded gravel | 30 – 60 |
| Well-graded gravel / crushed stone | 40 – 80 (and above) |
As a rough guide for pavement engineers: below 3% is a very weak subgrade that usually needs improvement (replacement, stabilisation, or a capping layer); 3–7% is poor to fair; 7–20% is fair to good; above 20% is a strong subgrade, and above 80–100% you are in base-course territory.
Practical note: If a lab reports a soaked CBR of 25% for a soft clay, do not celebrate — question the result. Either the sample was not truly soaked, the surcharge was missing, or the wrong soil was tested. Typical values exist so that impossible ones stand out.
How CBR Is Used in Pavement Design
The whole point of the test is thickness design. Methods such as the IRC 37 guidelines (and the older CBR design curves still used in many highway departments) read pavement thickness directly from two inputs: the design traffic (in million standard axles) and the subgrade CBR.
The logic is simple and unforgiving:
- Low CBR → thick pavement. A CBR of 3% can demand twice the granular thickness of a CBR of 8% for the same traffic.
- Improving the subgrade pays. Raising a weak subgrade from 3% to 7% — with a granular capping layer or cement/lime stabilisation — often saves more in pavement layers than the treatment costs.
This is why the CBR sits at the centre of any soil testing programme for civil and geotechnical work on road projects, and why the layers above it — sub-base and base course — are specified against their own CBR minimums (often 25–30% for sub-base and 80–100% for base course).
Frequently Asked Questions
What is the CBR test for soil?
A penetration test in which a 50 mm plunger is pushed into a compacted soil specimen at 1.25 mm/min, and the loads at 2.5 mm and 5.0 mm penetration are expressed as percentages of the loads needed for the same penetration in standard crushed stone.
Which standard covers the laboratory CBR test?
ASTM D1883 (and AASHTO T 193). The field/in-place version is ASTM D4429.
Why is the CBR specimen soaked for 4 days?
To simulate the weakest condition the subgrade will face — full saturation. Pavements fail in the wet season, so design is based on the soaked CBR. Swell during soaking is also recorded as a check on expansive soils.
What are the standard loads in the CBR test?
1,370 kg at 2.5 mm penetration and 2,055 kg at 5.0 mm penetration.
What is a good CBR value for a road subgrade?
It depends on traffic, but roughly: below 3% is very weak and usually needs treatment; 5–10% is workable for light roads; above 10–15% is a fair subgrade. Base course materials are typically required to reach 80–100%.
What should I do if the 5.0 mm CBR is higher than the 2.5 mm CBR?
Repeat the test. If the repeat gives the same pattern, report the 5.0 mm value as the CBR.
Final Thoughts
The CBR test is nearly a hundred years old, and pavement engineers still run it on almost every road project — because it works. A soaked specimen, an honest 4-day wait, a careful penetration curve, and one percentage number that decides how thick your road must be. Respect the soaking, distrust impossible values, and never let a design go out on an unsoaked number where the water table is high.
Written by Mohsin Raza Adil — BSc Civil Engineering Technologist (NTC-registered), Pakistan.

Mohsin Raza Adil
BSc Civil Engineering Technologist (NTC-registered), Pakistan. I write practical, field-tested guides on construction materials, soil testing and site engineering — the way it is actually done on site.

1 thought on “California Bearing Ratio (CBR) Test for Soil: Procedure and Calculation”