Waterproofing is the treatment of a building or structure so that water cannot pass through its surfaces or joints. It sounds simple, but water is the most persistent enemy a structure has: it corrodes reinforcement, causes dampness and mould, weakens mortar joints, produces efflorescence, and in cold regions destroys concrete through freeze–thaw cycles.
Most waterproofing failures are not caused by the wrong product — they are caused by the right product applied to an unprepared surface, or the wrong product chosen for a moving surface. This guide explains what waterproofing is for, the main systems available, where each one belongs, and how to avoid the usual failures.
Why Waterproofing Matters
Concrete looks solid, but it is full of microscopic pores and micro-cracks. Water travels through these by capillary action and under hydrostatic pressure. The damage shows up as:
- Corrosion of reinforcement — water and dissolved salts reach the steel, it rusts, expands, and spalls the concrete cover.
- Dampness and mould — interior walls stay wet, paint peels, and living conditions become unhealthy.
- Structural weakening — repeated wetting and drying leaches cement paste and softens mortar joints.
- Efflorescence — white salt deposits on brickwork, a sign that water is moving through the masonry.
Practical note: Waterproofing is one of the cheapest items in a building’s budget and one of the most expensive to fix after the building is finished. A basement waterproofed before backfilling costs a fraction of a basement repaired from the inside after the walls start weeping.
Types of Waterproofing Systems
1. Cementitious Waterproofing
A mixture of cement, graded sand or fine fillers, and polymer additives, mixed with water or a liquid polymer and applied by brush, trowel, or spray in two coats. It forms a rigid, hard layer bonded to the concrete.
- Best for: bathrooms, kitchens, internal wet areas, water tanks, swimming pools.
- Advantages: cheap, easy to mix and apply, excellent bond to concrete, non-toxic grades are safe for potable water tanks.
- Limitations: rigid — it cannot bridge moving cracks. Never use it where the substrate flexes or where structural movement is expected.
2. Liquid-Applied Membranes
Polymer coatings — polyurethane, acrylic, or bitumen-based — applied by brush, roller, or spray. They cure into a seamless, flexible, rubber-like layer with no joints.
- Best for: roofs, terraces, balconies, podiums, bathrooms.
- Advantages: seamless (no laps to fail), flexible enough to bridge hairline cracks, follows irregular shapes easily.
- Limitations: the final thickness depends entirely on the applicator’s care — thin spots are the classic failure. Two coats at right angles, with the manufacturer’s minimum thickness, is the minimum acceptable work.
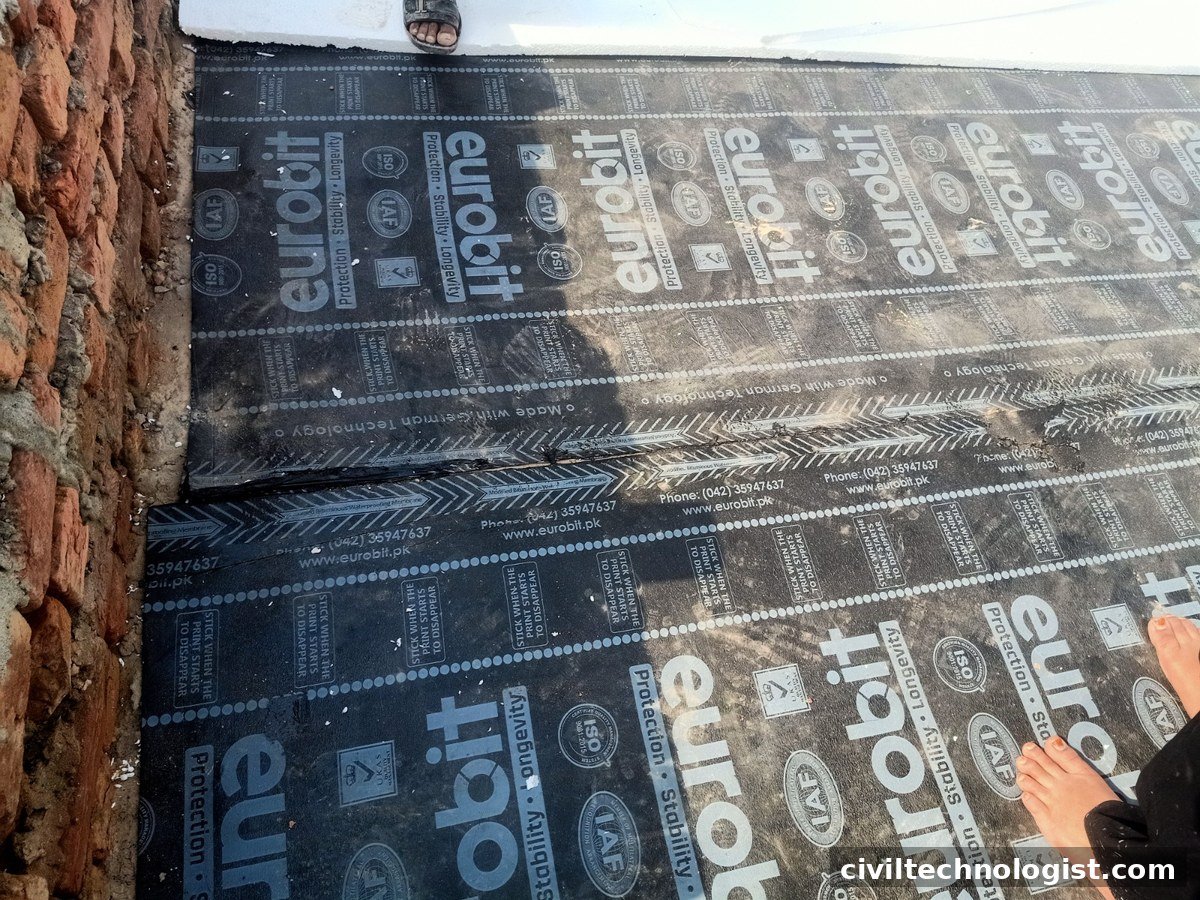
3. Bituminous Sheet Membranes
Factory-made rolls of bitumen modified with APP (atactic polypropylene) or SBS (styrene-butadiene-styrene), usually 3–4 mm thick, reinforced with polyester or fibreglass. They are torch-applied (the underside is melted onto the primed surface) or self-adhesive.
- Best for: flat roofs, foundations, basements, retaining walls.
- Advantages: consistent factory-controlled thickness, strong and durable, well proven on large horizontal areas.
- Limitations: installation needs a skilled crew — laps, corners, and upstands decide the system’s life. Bitumen softens in high heat, so exposed applications need a protective screed or reflective coating.
4. Crystalline Waterproofing
A different concept altogether: the material (applied as a coating or added as an admixture) contains chemicals that react with moisture and free lime inside the concrete, growing insoluble crystals that block the capillary pores — from the inside.
- Best for: basements, water-retaining structures, tunnels, foundations against a high water table.
- Advantages: becomes part of the concrete; it cannot peel, puncture, or delaminate, and it can self-heal minor cracks that form later.
- Limitations: only works where there is concrete to react with — it is useless on brickwork or plaster alone, and the concrete must be sound and properly cured.
5. EPDM and PVC Sheet Membranes
- EPDM (ethylene propylene diene monomer) is a synthetic rubber sheet, typically 1.2–1.5 mm, highly resistant to UV and temperature swings. It is a long-life choice for exposed roofs.
- PVC (polyvinyl chloride) sheets, around 1.5–2 mm, are widely used for tanking underground structures and lining water tanks and pools. PVC is not compatible with bitumen — never lay it directly against a bituminous surface.
6. Integral Waterproofing
Waterproofing admixtures added to the concrete mix itself, reducing permeability of the whole pour. Best treated as a supplement to a membrane or crystalline system on critical structures, not a substitute for one.
Where Each System Is Applied — Quick Reference
| Location | Recommended system | Why |
|---|---|---|
| Flat roof / terrace | Bituminous sheet membrane or liquid polyurethane membrane | Large area, exposed to sun and movement; needs seamless or factory-thickness protection |
| Basement walls (external) | Bituminous sheet or crystalline | Hydrostatic pressure from soil; apply before backfilling |
| Basement from inside (repair) | Crystalline coating | Only system that works against negative-side water pressure |
| Bathrooms / wet areas | Cementitious (2 coats) | Internal, no movement, cheap and reliable |
| Overhead / underground water tanks | Cementitious (food-safe grade) | In contact with stored water; must be non-toxic |
| Swimming pools | Cementitious + flexible topcoat, or PVC lining | Constant immersion; movement at joints needs flexibility |
| Industrial floors | Polyurethane / epoxy coatings | Abrasion and chemical resistance matter as much as water |
Applicable Standards for Waterproofing
Waterproofing is one area where “the applicator’s word” is not enough — the recognised standards define grades, testing, and workmanship:
- BS 8102:2022 — Code of practice for protection of below-ground structures against water ingress. Defines three waterproofing types (A: barrier, B: structurally integral, C: drained cavity) and is the benchmark reference for basements and substructures.
- ASTM C836/C836M — Specification for high-solids, cold liquid-applied elastomeric waterproofing membranes (the material standard behind most polyurethane/bitumen-polymer liquid membranes).
- ASTM C898/C898M — Guide for the proper use and application of those liquid-applied membranes.
- ASTM D41/D41M — Asphalt primer used in roofing, dampproofing, and waterproofing (surface preparation standard for bituminous systems).
- ASTM D226/D226M — Asphalt-saturated organic felt used with asphalt for roofing and waterproofing.
Always confirm which standard your project specification names — acceptance testing and warranty terms usually hang on it.
How to Choose the Right System
Ask these questions before buying anything:
- Which side is the water on? External (positive-side) waterproofing is always more reliable than internal (negative-side) repair. If you are at design stage, protect the outside face.
- Does the surface move? Roofs expand and contract daily — rigid cementitious coatings will crack there. Use flexible systems.
- What is the water pressure? A damp basement wall and a basement below the water table need very different systems.
- What is the substrate? Crystalline systems need concrete; membranes need a sound, clean, primed surface.
- Can it be protected? Exposed membranes on roofs should be covered with a protective screed, tiles, or reflective coating to survive UV and foot traffic.
Practical note: The most reliable roofs follow the same pattern — clean and prime the slab, lay the membrane with proper laps (75–100 mm minimum), form coves at all wall junctions, protect with screed, and finish with drainage that actually drains. Ponding water defeats every system eventually.
Common Waterproofing Failures (and How to Avoid Them)
- Poor surface preparation. Dust, loose material, and laitance prevent bonding. Clean, repair, and prime — always.
- Untreated cracks. Fill structural cracks and form a fillet (cove) at wall–floor junctions before the membrane goes on.
- Thin or missed areas. With liquid membranes, mark out the area and calculate the material quantity per square metre so coverage can be checked.
- Bad laps and joints. Sheet membrane laps must be fully bonded with the specified overlap; a lifted lap is a future leak.
- Punctures after installation. Protect the finished membrane before other trades walk on it — a dropped tool can undo a day’s work.
- Ignoring drainage. Waterproofing keeps water out; drainage keeps water away. A blocked roof outlet will find the weak point of any system.
- Testing skipped. Flood-test roofs and terraces for 48–72 hours before covering the membrane. A leak found now is a repair; a leak found after tiling is a demolition.
Application Steps — The General Sequence
- Clean the surface: remove dust, oil, loose concrete, and protrusions.
- Repair defects: fill cracks, honeycombs, and tie holes with repair mortar.
- Form coves/fillets at all internal corners (wall–floor, wall–parapet).
- Prime the surface with the manufacturer’s recommended primer and let it dry.
- Apply the system: two coats for liquids/cementitious (second coat at right angles), or lay sheets with proper laps.
- Protect the membrane: screed, protection board, or tiles as specified.
- Test: ponding/flood test for horizontal surfaces before handover.
Frequently Asked Questions
What is the best waterproofing for a flat roof?
For most houses, a 3–4 mm APP/SBS bituminous sheet membrane or a two-coat polyurethane liquid membrane, both protected with screed or tiles. The choice depends on budget and applicator skill.
Can waterproofing be applied on the inside of a basement?
Yes, but only crystalline systems are designed to resist water pushing from the other side. Internal coatings over a leaking external wall are a temporary fix at best.
How long does roof waterproofing last?
A properly installed and protected bituminous or EPDM membrane typically lasts 15–25 years. Exposed, unprotected systems fail much earlier.
Is cementitious waterproofing enough for a bathroom?
Yes — two coats of polymer-modified cementitious waterproofing on walls and floor, with corners reinforced, is the standard and reliable solution for bathrooms.
Why does waterproofing fail even with good material?
Almost always application issues: dirty surface, thin coverage, unsealed laps, untreated cracks, or damage by later trades. Material quality is rarely the real cause.
Final Thoughts
Waterproofing is not a product — it is a system of surface preparation, correct product selection, careful application, protection, and testing. Get those five right and even a modest material will serve for decades. Skip any one of them and even the best membrane will leak.
For the roof build-up that sits above the waterproofing layer, see warm roof construction.
Written by Mohsin Raza Adil — BSc Civil Engineering Technologist (NTC-registered), Pakistan.

Mohsin Raza Adil
BSc Civil Engineering Technologist (NTC-registered), Pakistan. I write practical, field-tested guides on construction materials, soil testing and site engineering — the way it is actually done on site.
3 thoughts on “What Is Waterproofing? Purpose, Types, and Application Guide”